引言
在网站中添加一些实用的小工具可以提升用户体验,让访客在浏览网站的同时获取更多的信息。今天,我将向大家介绍如何在 WordPress 的小工具区添加一个时间天气小组件,让你的网站更具个性化和实用性。
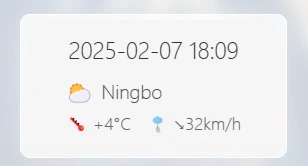
效果展示
准备工作
在开始之前,请确保你的 WordPress 网站已经安装并启用了支持小工具功能的主题。大多数 WordPress 主题都自带小工具功能,你可以在后台的“外观”菜单下找到“小工具”选项。
不过本项目使用HTML+Javascript实现,对于其他静态页面或内容管理系统,只要支持插入自定义HTML代码,均可使用。
添加自定义 HTML 小工具
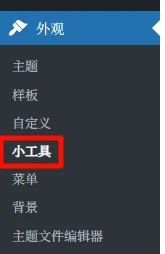
登录到你的 WordPress 管理后台,导航到“外观”>“小工具”。在小工具页面中,找到一个你希望放置时间天气小组件的侧边栏或其他小工具区域。点击“添加”按钮,选择“自定义 HTML”。

在HTML代码框中输入如下代码:
<div class="weather-widget">
  <div id="current-datetime"></div>

  <div class="weather-info">
    <div class="weather-item">
      <span id="weather-icon" class="weather-icon">天气-</span>
      <span id="weather-status">加载中...</span>
    </div>
    <div class="weather-details">
      <span>🌡️ <span id="temp">-</span></span>
      <span>🎐 <span id="wind">-</span></span>
    </div>
  </div>
</div>

<style>
.weather-widget {
  padding: 15px;
  background: none;
  border-radius: 8px;
  text-align: center;
}

#current-datetime {
  font-size: 1.2em;
  margin-bottom: 10px;
}

.weather-info {
  display: inline-block;
  text-align: left;
}

.weather-item {
  display: flex;
  align-items: center;
  gap: 8px;
}

.weather-icon {
  font-size: 20px;
}

.weather-details {
  margin-top: 5px;
  display: flex;
  gap: 15px;
  font-size: 0.9em;
}
</style>

<script>
// 日期时间更新函数
function updateDateTime() {
  const now = new Date();
  const dateOptions = {
    year: 'numeric',
    month: '2-digit',
    day: '2-digit'
  };
  const timeOptions = {
    hour: '2-digit',
    minute: '2-digit',
    hour12: false
  };

  const dateStr = now.toLocaleDateString('zh-CN', dateOptions)
    .replace(/\//g, '-');
  const timeStr = now.toLocaleTimeString('zh-CN', timeOptions);

  document.getElementById('current-datetime').innerHTML =
    `${dateStr} ${timeStr}`;
}

// 天气获取函数
async function getWeather() {
  try {
    // 获取位置信息
    const ipResponse = await fetch('https://ipapi.co/json/');
    const location = await ipResponse.json();

    // 获取天气数据(使用wttr.in服务)
    const weatherResponse = await fetch(
      `https://wttr.in/${location.city}?format=%c+%t+%w&lang=zh`
    );
    const weatherData = await weatherResponse.text();
    const [icon, temp, wind] = weatherData.trim().split(/\s+/);

    // 更新显示
    document.getElementById('weather-status').innerHTML =
      `${location.city}`;
    document.getElementById('weather-icon').textContent = icon;
    document.getElementById('temp').textContent = temp;
    document.getElementById('wind').textContent = wind;
  } catch (error) {
    console.error('天气信息获取失败:', error);
    document.getElementById('weather-status').textContent = '天气获取失败';
  }
}

// 初始化
updateDateTime();
setInterval(updateDateTime, 1000);
getWeather();
</script>
保存并预览
设置完代码后,点击“保存”按钮。此时,你可以在小工具区域中看到刚刚添加的时间天气小组件。如果你的主题支持实时预览功能,你可以直接在前端页面中查看效果。
代码解析
1. HTML 部分
HTML 部分定义了时间天气小组件的结构。<div class="weather-widget"> 是整个小组件的容器,其中包含了当前日期时间显示区域和天气信息显示区域。天气信息区域又分为天气图标、天气状态、温度和风速等子元素。
2. CSS 部分
CSS 部分用于美化时间天气小组件的外观。通过设置背景颜色、边框圆角、字体大小、颜色等样式属性,使小组件看起来更加美观和协调。例如,.weather-widget 类设置了小组件的内边距、背景颜色和圆角;#current-datetime 类设置了日期时间的字体大小和颜色等。
3. JavaScript 部分
JavaScript 部分实现了时间和天气信息的动态获取和更新。
updateDateTime() 函数:用于获取当前的日期和时间,并将其格式化为指定的格式,然后更新到页面中的 #current-datetime 元素中。通过 setInterval 方法,每隔 1 秒调用一次该函数,以实现时间的实时更新。
getWeather() 函数:用于获取天气信息。首先通过 fetch 方法调用 https://ipapi.co/json/ API 获取用户的地理位置信息,然后根据获取到的城市名称,调用 https://wttr.in/${location.city}?format=%c+%t+%w&lang=zh API 获取天气数据。获取到天气数据后,将其解析为图标、温度和风速等信息,并更新到页面中的相应元素中。
注意
本组件依赖于 ipapi.co 获取地理位置和 wttr.in 获取天气信息,如果你的网络无法连接到这两个服务,则可能无法正常显示天气。
组件通过IP地址分析用户地理位置,可能导致定位错误。
结语
通过以上步骤,你就可以在 WordPress 的小工具区成功添加一个时间天气小组件,为你的网站增添一份实用性和个性化。这个小组件不仅可以帮助访客快速获取当前的时间和天气信息,还可以提升网站的整体用户体验。
除非注明,否则均为天远日记原创文章,转载必须以链接形式标明本文链接
Comments NOTHING